Understanding HTML forms
For years I’ve constantly found myself struggling (as I come back to it again and again) with HTML forms. Not necessarily because I don’t understand how they work, but more because I’m not exposed to them that often.
However, that said, I’ve now got to start building a system that has some forms in it and I’m therefore revisiting my notes to freshen up on the topic. I decided to write a blog post as my own personal “cheat sheet” on it so that I can come back to it in the future.
The form tag
Forms are what we use to send or receive data, to or from a server or database from our website and a simple example is shown below.
<form action="this-page.html" method="post">

</form>
The above is the “shell” or “wrapper” of a form that has no inputs in it. The first part “action” is going to specify the location that the data (added into the form) is to be sent to, and the “method” (“get” by default) describes the type of HTTP request that we’re looking to make whether that be to save or retrieve data.The form input types
Form input types
So the main form input types that we have available (or rather that we use more often) are button, checkbox, email, password, radio button or text to name a few; as seen below.
<input type="text" name="">
<input type="email" name="">
<input type="password" name="">
A form is then created by adding the input elements into the previously discussed form element. A very crude example is shown below.
<form action="this-page.html" method="post">
	<input type="text" name="">
	<input type="email" name="">
	<input type="submit">
</form>
The example above is a sort of starting template for a form as it currently wouldn’t do anything. As we can see in the examples above, the name attribute is not set in any of the inputs and it is the name attribute that passes that data through to the next page (mentioned in the form as “action”).
<form action="this-page.html" method="post">
	<input type="text" name="name">
	<input type="email" name="email">
	<input type="submit">
</form>
By adding in the “name” attribute into the inputs, we’re now sending that value as a query string to the page mentioned in in the form’s “action” attribute. This will appear on the end of the URL on the landing page as seen in the image below.

We can see in the image above that when we pass the query string through to the URL using the “name” attribute that we are given the name of the information (i.e. first name) and that is linked to the value that the user input into that box on the web form (i.e. John). The same goes for email (in the example above) and any other inputs that have their “name” attribute set.
Writing labels for inputs
When the code for the form above is loaded into a browser (through a html file) the output is a very hard to understand form as seen in the image below. A user wouldn’t know which boxes were asking for what information so we need to improve on this form a bit. To do that we’re going to give our inputs labels.
Labels are very important for making our site accessible in that, someone who is blind may need our labels to help them fill out the form because screen reading software looks for labels.

There are two methods to label our inputs. The first would be to wrap the input in a “label” tag (which I think helps to illustrate how labels work) as shown in the code below.
<label>
	Name:
	<input type="text" name="name">
</label>
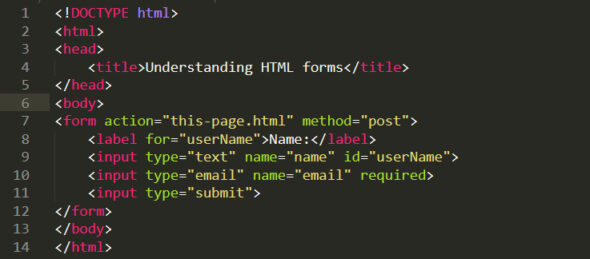
The input is “tied” to the label because it has been inserted inside the <label> tags. The other method is to “tie” an input to a label using both a “for” attribute (in the label) and an “id” attribute (in the input) as shown by the following code.
	<label for="userName">Name:</label>
	<input type="text" name="name" id="userName">
Validating forms
Validations halp us ensure the data we’re sending or receiving is in the correct format for us to use. For example. If our system expects an email address but receives a name or a floating point number then it won’t work as expected. When internet users generate data, we need to validate it to ensure we get the results we want later on when using it.
To validate an email address, we simply set the type attribute of the input to “email” and then we set that input as “required” as shown in the code below.
<input type="email" name="email" required>
Doing this will make the input required, and it will not accept just any input until a valid email is input into the box.
That’s it for now. This is just a load of front end stuff to do with forms. I’m going to need to do some stuff in the back end to tie this information together and will either revisit this post, or link to a new one, expanding on this one when I’ve written it!